Table of Contents
Many desktop publishing packages and web page editors now use Lorem Ipsum as their default model text, and a search for 'lorem ipsum' will uncover many web sites still in their infancy. Various versions have evolved over the years, sometimes by accident, sometimes on purpose (injected humour and the like).

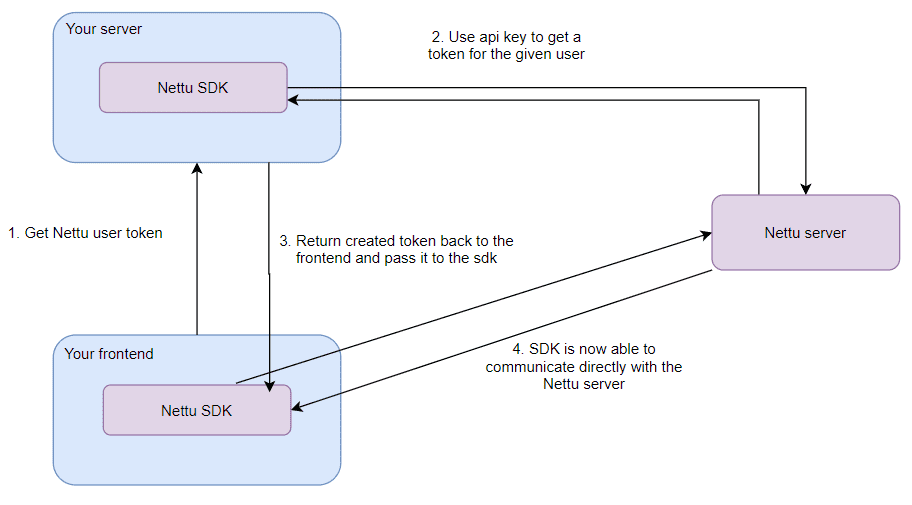
1. Get Nettu user token
In the first step you will need to query your server for a Nettu user token in order to use the SDK.
2. Use the secret api key to create an access token for the enduser
In this step you will have to authenticate your user and find which nettu user id it belongs to and thereafter request a token for that user. The authentication logic is probably something you already have in place and its implementation is not of concern to this integration process. With every user in your application that wish to take advantage of the Nettu API it should be created a corresponding nettu user so that your application can link them. If the user that is requesting a token does not yet have a nettu user id stored with it, you can easily create one as follows:
tutorial.js
The returned userId is a nettu user id that you can store with your user in your database
so that you can reference it in future requests. All bookings, purchases etc will be stored with
this userId, so it is important to save it.
Once you have a nettu user id associated with your user you can use the nettu sdk to issue
user tokens with a call to the users.createToken method as shown below:
tutorial.js
3. Return created token back to the frontend
Back in your frontend you can create a NettuClient for your enduser with the newly created access token.
tutorial.js
4. Frontend Nettu SDK is now ready! 🚀
Your frontend Nettu SDK now has complete access to all SDK methods which your user is authorized to call, and can call them directly without communicating with your server! It can list bookings, manipulate calendars, check available employees, connect to google calendar and so much more for you to explore.
Edit this page on GitHub